More actions
No edit summary |
No edit summary |
||
| (3 intermediate revisions by the same user not shown) | |||
| Line 1: | Line 1: | ||
Android and iOS both rule the smartphone market and have received significant makeovers in recent years with new versions bringing fresh designs. Android is now almost 8 years old, and in that time it's gone from a quirky piece of mobile software to a full-fledged Linux driven operating system and powerful brand. The big cell phone companies leave their mark on Android by altering the design of Google's mobile operating system - Stock Android or "pure Android" or "vanilla Android," - just as mother Android did building on Linux. | |||
How to Configure your Email Address on your Android Device | How to Configure your Email Address on your Android Device | ||
| Line 9: | Line 7: | ||
[[File:Andriod1.jpg]] | [[File:Andriod1.jpg]] | ||
2. Open the 'Email' Application. | 2. Open the 'Email' Application. Go for Manual Setup | ||
[[File:Andriod2.jpg]] | [[File:Andriod2.jpg]] | ||
3. Select the Account Type as either 'POP' or 'IMAP account'. ( | 3. Select the Account Type as either 'POP' or 'IMAP account'. (We recommend: IMAP on Mobile, POP on Desktop) | ||
Standard Ports: 110 / 25 / 143 (POP / SMTP / IMAP) | |||
Suggested Secure Ports: 995 / 587 / 993 (with SSL / TLS) | |||
[[File:Andriod3.jpg]] | [[File:Andriod3.jpg]] | ||
4. Enter your Email address & Password > Click on Next | 4. Enter your full Email address & Password > Click on Next | ||
[[File:Andriod4.jpg]] | [[File:Andriod4.jpg]] | ||
| Line 30: | Line 31: | ||
*** For IMAP Configuration | *** For IMAP Configuration | ||
IMAP Server: | IMAP Server: | ||
mail.yoursite.com (eg: mail.osspl.com) | |||
Port: 143 | SSL Security: Accept All Certificates | ||
Port: 993 or 143 | |||
*** For POP Configuration | *** For POP Configuration | ||
POP Server: | POP Server: | ||
mail.yoursite.com (eg: mail.osspl.com) | |||
Port: 110 | SSL Security: Accept All Certificates | ||
Port: 995 or 110 | |||
Click on Next | Click on Next | ||
| Line 45: | Line 47: | ||
6. Enter the information as per the instructions provided on the following screen: | 6. Enter the information as per the instructions provided on the following screen: | ||
SMTP Server: | SMTP Server: mail.yoursite.com (eg: mail.osspl.com) | ||
Port: 587 | Port: 587 | ||
Security Type: | Security Type: TLS Accept All Certificates | ||
Require sign-in: Keep in marked/ticked | Require sign-in: Keep in marked / ticked | ||
Click on Next | Click on Next | ||
User name: <Complete Email address> | User name: <Complete Email address> | ||
Password: <Email Password>. | Password: <Email Password>. | ||
| Line 65: | Line 68: | ||
[[File:Andriod9.jpg]] | [[File:Andriod9.jpg]] | ||
9. You have successfully setup an email account on your Android Device. | 9. You have successfully setup an email account on your Android Device. You may try sending/receiving a test email from the email application. | ||
You may try sending/receiving a test email from the email application. | |||
NB: Above is a standard email setup guide on Android devices As there are many device models and tools, you may need need to adjust and test. | |||
[[Category: Products]] | [[Category: Products]] | ||
Latest revision as of 13:13, 17 September 2016
Android and iOS both rule the smartphone market and have received significant makeovers in recent years with new versions bringing fresh designs. Android is now almost 8 years old, and in that time it's gone from a quirky piece of mobile software to a full-fledged Linux driven operating system and powerful brand. The big cell phone companies leave their mark on Android by altering the design of Google's mobile operating system - Stock Android or "pure Android" or "vanilla Android," - just as mother Android did building on Linux.
How to Configure your Email Address on your Android Device
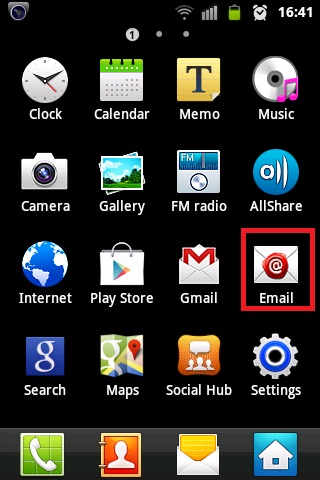
1. Click on the Applications / Menu button on the Home Screen of your Android Device
2. Open the 'Email' Application. Go for Manual Setup
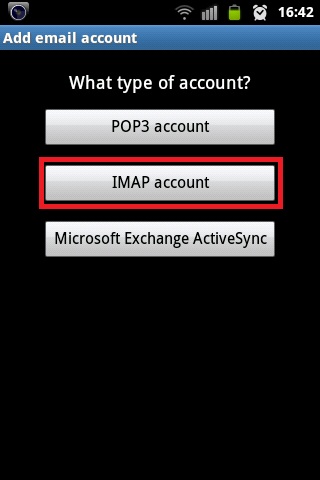
3. Select the Account Type as either 'POP' or 'IMAP account'. (We recommend: IMAP on Mobile, POP on Desktop)
Standard Ports: 110 / 25 / 143 (POP / SMTP / IMAP) Suggested Secure Ports: 995 / 587 / 993 (with SSL / TLS)
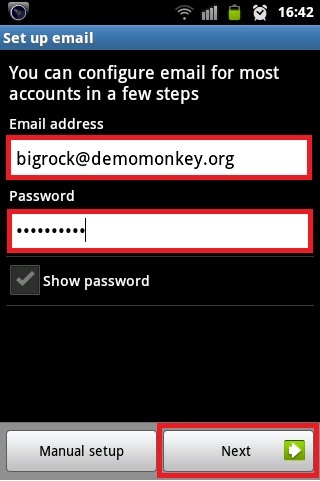
4. Enter your full Email address & Password > Click on Next
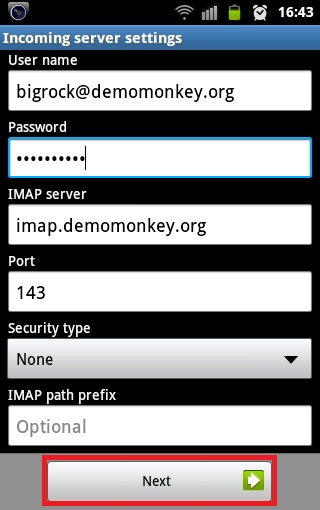
5. Enter the information as per the instructions provided on the following screen:
User name: <Complete Email address> Password: <Email Password>
- For IMAP Configuration
IMAP Server: mail.yoursite.com (eg: mail.osspl.com) SSL Security: Accept All Certificates Port: 993 or 143
- For POP Configuration
POP Server: mail.yoursite.com (eg: mail.osspl.com) SSL Security: Accept All Certificates Port: 995 or 110
Click on Next
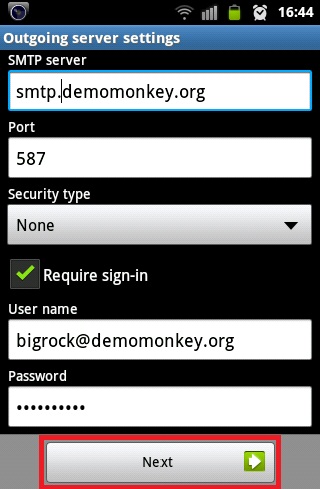
6. Enter the information as per the instructions provided on the following screen:
SMTP Server: mail.yoursite.com (eg: mail.osspl.com) Port: 587 Security Type: TLS Accept All Certificates Require sign-in: Keep in marked / ticked Click on Next
User name: <Complete Email address> Password: <Email Password>. Click on Next
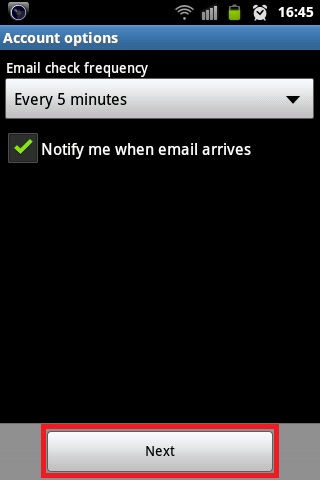
7. Select 'Email check frequency' 'Notify me when email arrives' as per your preference.
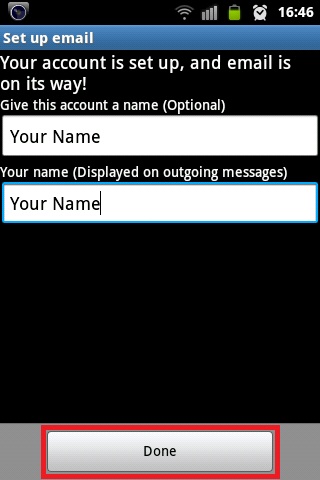
8. Give an account name for the configuration (optional). Enter Your Name and click on Done.
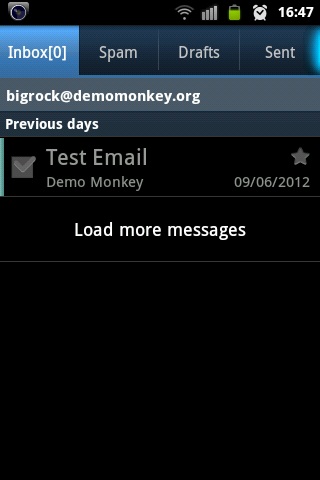
9. You have successfully setup an email account on your Android Device. You may try sending/receiving a test email from the email application.
NB: Above is a standard email setup guide on Android devices As there are many device models and tools, you may need need to adjust and test.

