More actions
No edit summary |
No edit summary |
||
| Line 1: | Line 1: | ||
We allow secure SFTP for transfer of web data / files, SFTP differs from HTTP for serving websites via web browsers as it is an application made up of | We allow secure SFTP for transfer of web data / files, SFTP differs from HTTP for serving websites via web browsers as it is an application made up of secure SSH / TCP connections. It is more secure than standard FTP. Guide To Upload Content / Files using FileZilla (You can also use alternatives like CuteFTP, CoreFTP, SmartFTP, WS_FTP, Firefox FireFTP, etc..) | ||
Step 1. Open FileZilla and choose Site Manager under the File menu. | Step 1. Open FileZilla and choose Site Manager under the File menu. | ||
| Line 27: | Line 27: | ||
==External links== | ==External links== | ||
*[http://suppor.osspl.com | *[http://suppor.osspl.com More for SFTP Help] | ||
*[http://indiahosting.org/hosting.php Buy Shared CPanel Hosting] | *[http://indiahosting.org/hosting.php Buy Shared CPanel Hosting] | ||
Revision as of 14:05, 19 June 2016
We allow secure SFTP for transfer of web data / files, SFTP differs from HTTP for serving websites via web browsers as it is an application made up of secure SSH / TCP connections. It is more secure than standard FTP. Guide To Upload Content / Files using FileZilla (You can also use alternatives like CuteFTP, CoreFTP, SmartFTP, WS_FTP, Firefox FireFTP, etc..)
Step 1. Open FileZilla and choose Site Manager under the File menu.
Step 2. Click the New Site button.
Step 3. Provide the following details (which you get on hosing activation), label as yoursite.com and click the Connect button:
Host: yoursite.com SFTP Port: Check your email Protocol: SFTP - Secure File Transfer Protocol Logon Type: Normal User: SFTP Username for yoursite.com Password: Password for the above SFTP User
Step 5. Select the Always trust certificate in future sessions. option and then click the OK button.
Step 6. Once connected, "web" folder by double-clicking it. Depending upon the Directory/Folder structure of the Web Hosting package, you would need to upload your files to the relevant folder, but default is "web".
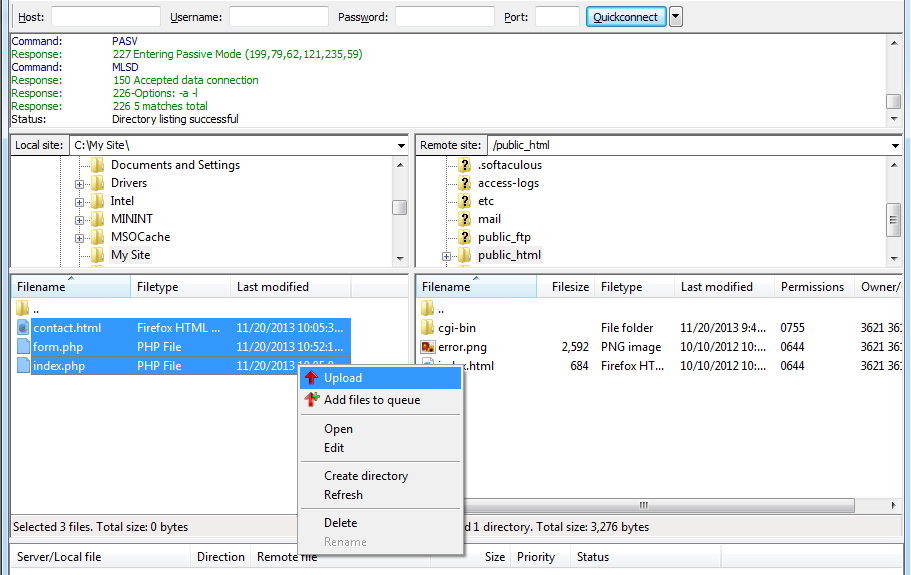
Step 7. In the left pane, select the files to upload. Right-click and choose Upload. The files will be transferred to the remote server. You can remove default web files. If you were to upload a file index.html within the web folder of your website yoursite.com, then when someone tries to reach either yoursite.com or www.yoursite.com, then they would be automatically displayed the content of the index.html file. This happens since our server treats the index.html as the home page or default page for this directory.
Similarly, if you were to upload an index.html file within the /web/blog folder, then when someone types yoursite.com/blog or www.yoursite.com/blog, then they would be automatically displayed the content of the index.html file within the plants folder.
Now, if you were to upload two or more files from amongst the list given above, then the one mentioned higher in the order would be considered as the home page. So in the event that there exists an index.php and index.html file within the same folder, then the index.php file will get considered as the home page.
