More actions
No edit summary |
mNo edit summary |
||
| (2 intermediate revisions by the same user not shown) | |||
| Line 2: | Line 2: | ||
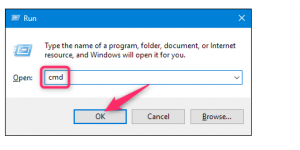
Press the Windows+R key combination in order to open the Run dialog box. Type the following command and click the OK button: | Press the Windows+R key combination in order to open the Run dialog box. Type the following command and click the OK button: | ||
cmd | cmd > ipconfig /flushdns | ||
ipconfig /flushdns | |||
[[File:PingWin.png|thumb|Ping]] | |||
[[File:FlushDNS.png|thumb|FlushDNS]] | |||
Ubuntu Linux: | Ubuntu Linux: | ||
| Line 22: | Line 24: | ||
Mac OS X Leopard and below: | Mac OS X Leopard and below: | ||
sudo lookupd -flushcache | sudo lookupd -flushcache | ||
==External links== | |||
*[https://h.osspl.com/ Contact Helpdesk] | |||
[[Category: About]] | |||
[[Category: Business Email]] | |||
[[Category: Custom Servers]] | |||
[[Category: Virtual Private Server]] | |||
[[Category: SSL Certificates]] | |||
[[Category: Digital Marketing]] | |||
[[Category: Mobile Apps]] | |||
Latest revision as of 09:21, 9 August 2021
On Windows XP; Vista; 7; 8; 8.1; 10
Press the Windows+R key combination in order to open the Run dialog box. Type the following command and click the OK button: cmd > ipconfig /flushdns


Ubuntu Linux: sudo service network-manager restart
Other Linux: sudo /etc/init.d/nscd restart
Mac OS Sierra / Mavericks / Mountain Lion: sudo killall -HUP mDNSResponder
Mac OS X Yosemite: sudo discoveryutil udnsflushcaches
Mac OS X Snow Leopard: sudo dscacheutil -flushcache
Mac OS X Leopard and below: sudo lookupd -flushcache